Photogram: Movement Triptych
OBJECTIVE
This is a THREE part project. Part One of the assignment should be done at home as a "FLIPPED ASSIGNMENT" in which it will be your responsibility to plan your images, location and models on your end so that we can transform those images you shoot on your photographic devise (such as your phone) into printed silhouettes in the darkroom. Your images MUST be accessible for use in class; so It will be your responsibility to keep the original JPG images saved to your drive so you are prepared in the lab. The final product in the darkroom will come from those images.
This is a THREE part project. Part One of the assignment should be done at home as a "FLIPPED ASSIGNMENT" in which it will be your responsibility to plan your images, location and models on your end so that we can transform those images you shoot on your photographic devise (such as your phone) into printed silhouettes in the darkroom. Your images MUST be accessible for use in class; so It will be your responsibility to keep the original JPG images saved to your drive so you are prepared in the lab. The final product in the darkroom will come from those images.
PART ONE: Flipped Assignment to be done independently at home FIRST
Shooting the images….
With your phone shoot at least three images of a series that describe a single movement like running or dancing or jumping rope. Try to include the whole person into the shot without a lot of background distractions. You may have someone take images of you as the model or select a model to help you represent those actions. Take a minimum of six images so you can select and print the best three for the project. Be sure to try to include the full individual or range of motion into each shot.
With your phone shoot at least three images of a series that describe a single movement like running or dancing or jumping rope. Try to include the whole person into the shot without a lot of background distractions. You may have someone take images of you as the model or select a model to help you represent those actions. Take a minimum of six images so you can select and print the best three for the project. Be sure to try to include the full individual or range of motion into each shot.
PART TWO: In Digital Lab & Classroom
Preparing images for the darkroom….
Save the best THREE images to your GOGGLE DRIVE so that you can get to them when we get into the lab.
It will be your responsibility to keep the original JPG images saved to your drive so you are prepared in the lab. I will not ask or remind you...so please mark it in your calendars.
We will size your images in class in the lab to the appropriate size for the project and be printing your top THREE images as 3x5 or 5x7 prints. In the classroom we will use transfer paper to trace the contour of each action onto a black piece of railroad board and cut out each silhouette using an exact-o knife. Be considerate of any details in the contour and your quality of line/cutting.
PART THREE: Darkroom
Creating a Photogram series in the darkroom…
Place your silhouette on top of a piece of photographic paper and place a glass over the top to apply even pressure to the cut out. With the enlarger, shine light onto the paper to create a white silhouette after the paper has been developed. Create a separate photogram for each silhouette and align them in a way that helps to illustrate the motion your captured. (ex: if the image is of bouncing the silhouettes might "bounce" within the set by moving up or down within the composition)
Place your silhouette on top of a piece of photographic paper and place a glass over the top to apply even pressure to the cut out. With the enlarger, shine light onto the paper to create a white silhouette after the paper has been developed. Create a separate photogram for each silhouette and align them in a way that helps to illustrate the motion your captured. (ex: if the image is of bouncing the silhouettes might "bounce" within the set by moving up or down within the composition)
|
FINAL IMAGE
Presentation….
Mount each silhouette in order of the progression of the movement you chose onto a sheet of construction paper. Leave an inch boarder around the entire piece and ¼ inch boarders in between each image. |
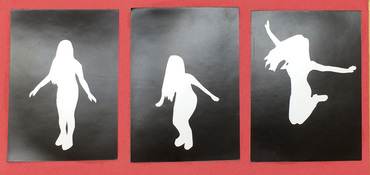
Student Samples
|
